Production Deployment
Deployment Architecture and Services
Evolution History
- Since
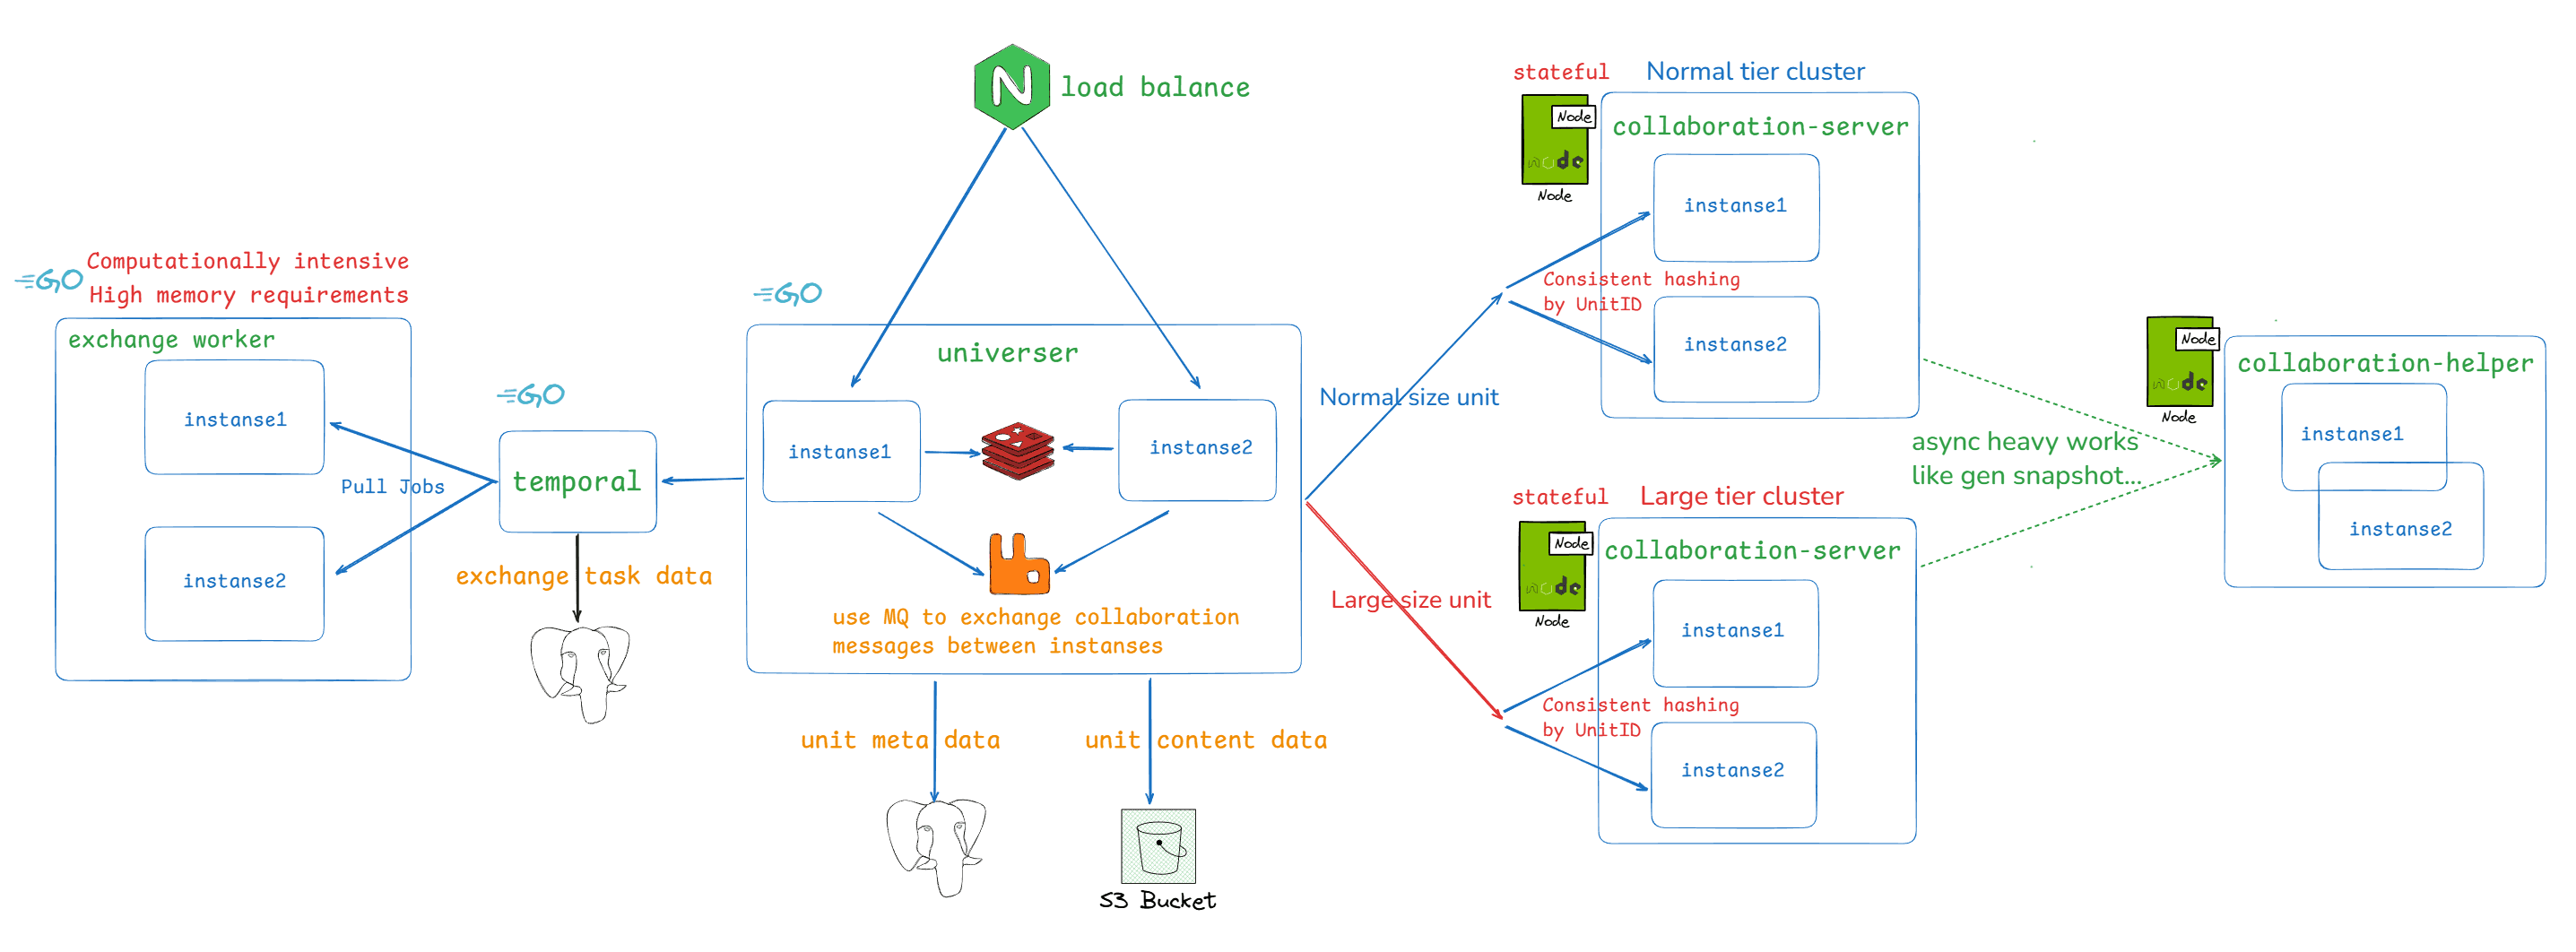
v0.13.0, thecollaboration-helperservice has been added to handle asynchronously executed CPU-intensive tasks (such as snapshot generation). - Since
v0.15.0, tiered collaborative editing scheduling has been introduced to route operations on spreadsheets of different scales to different collaboration service clusters, reducing the impact of large spreadsheets on normal-scale spreadsheets.
Service Introduction
- collaboration-server: The back-end collaborative editing engine, implementing the same OT algorithm as the front end.
- collaboration-helper: Responsible for handling CPU-intensive tasks during collaboration (such as snapshot generation) to ensure smooth collaborative editing. Note: introduced since
v0.13.0. - universer: Handles document operation requests, maintains document data, and is responsible for broadcasting collaborative messages.
- exchange worker: Responsible for executing document import/export computation tasks; it is a compute-intensive service with high memory requirements.
collaboration-server is a stateful service. Edit requests for the same document are processed within the same collaboration-server instance, which reduces data loading overhead and improves overall performance. Therefore, universer adds a layer of consistent-hash routing when calling collaboration-server to process editing operations.
Component Introduction
- RDS: Relational database, used to store document metadata, permission configurations, etc.
- Object Storage: Object storage, used to store document content data, including images, data chunks, etc.
- Redis: Cache for online document collaborators and API rate limiting.
- RabbitMQ: Message queue, used for universer services to exchange collaborative messages that need to be broadcast.
- Temporal: Open-source workflow execution engine; Univer uses it to manage the asynchronous workflow of document import/export.
Pre-Deployment Preparation
After understanding the basic architecture of Univer back-end services, the following items should be evaluated before production deployment:
Deployment Method Selection
Univer currently provides two deployment methods:
-
Docker Compose Deployment Docker Compose only supports single-machine deployment, and scaling is primarily vertical. Horizontal scaling is not supported. It is suitable for scenarios without Kubernetes O&M capabilities and with relatively small usage scale.
-
Standard Kubernetes-Compatible Deployment If you already operate a Kubernetes cluster and it is compatible with standard K8s patterns, this method is recommended. Univer supports horizontal scaling, and K8s deployment provides the best scalability.
User Identity Authentication and Permission Validation
Univer's installation configuration does not enable identity authentication and permission validation by default. You need to decide whether to enable it based on actual business requirements. See Integrate with Your System via USIP for details.
Infrastructure Component Selection
As shown in the system deployment architecture above, Univer's dependent infrastructure components include MQ, Redis, RDS, and Object Storage. Univer's installation package includes common open-source versions of the corresponding components.
At the same time, Univer supports switching to self-maintained components, and it is strongly recommended to do so in production environments for the following reasons:
- Facilitates system maintenance
- Ensures data storage security
- Ensures stable system operation
This is especially true for RDS and Object Storage, which store document data. If you use Univer's built-in versions, physical machine storage damage may cause permanent data loss. If you lack your own storage infrastructure, it is recommended to choose services provided by public cloud vendors. If you can only use Univer's built-in storage components, be sure to back up data regularly, preferably once a day.
If you choose to use self-maintained components, ensure they are fully compatible with Univer's requirements. The requirements for each component are as follows:
MQ
Must be fully compatible with AMQP/AMQPS; RabbitMQ is currently recommended. The official image used in Univer's installation package is rabbitmq:3-management.
Redis
Must be compatible with all Redis commands. The official image used in Univer's installation package is bitnami/redis:7.0.15-debian-11-r3.
The Redis commands currently used by Univer include: GET, MGET, SET, SETNX, DEL, EXISTS, EXPIRE, HSET, HGET, HDEL, HGETALL, HLEN, SCAN, Pipeline, EVAL, EVALSHA. Ensure the Redis component is compatible with the above commands. Under the premise of meeting compatibility, a distributed version of Redis can also be used.
RDS
Currently adapted for PostgreSQL 16.1, MySQL 8.0, GaussDB, and DamengDB. You can choose one of the above databases or a compatible alternative. The official image used in Univer's installation package is postgres:16.1.
Please note that Univer currently does not support distributed databases that require sharding by table fields. If a distributed database is not fully compatible with the access method of a single-machine database, it cannot be used. In addition, if you use a fully compatible distributed database such as TiDB, you should also be cautious—Univer's current ID generator produces trend-incrementing IDs, which may cause requests to concentrate on the same node and create performance bottlenecks.
Object Storage
Must be compatible with the AWS S3 API. The official image used in Univer's installation package is bitnami/minio:2024.8.3-debian-12-r1.
Observability Components
When subsequently operating and maintaining Univer back-end services, you need to determine whether to use Univer's integrated observability components or connect to an existing observability system. Univer currently provides Prometheus metrics, Grafana dashboards, and service logs. For connection details, see the SRE Manual.
If you do not have an observability system or find it difficult to integrate, it is recommended to enable Univer's built-in observability components.
Next Steps
After completing the above evaluation, please read the following documents according to the actual deployment method:
- Capacity Planning — Estimate required CPU, memory, and instance counts
- Docker Compose Deployment Guide — Docker Compose configuration and deployment steps
- Kubernetes Deployment Guide — K8s configuration and deployment steps
How is this guide?