USIP Integration
Univer Pro does not include an account system by default. If you need identity verification, permission control, or system integration, use USIP (Univer Server Integration Protocol). USIP is an SPI: Univer defines the interfaces, and your system implements them.
Use Cases
- Access requires login
- Role-based editing permissions
- Sync collaborator info, comments, and edit time
Integration Flow
- Implement the USIP APIs (see below)
- Enable USIP in deployment config
- Forward auth headers from the client (e.g., token)
USIP APIs
USIP currently covers three categories:
- 👥 Account: identity verification, user info
- 🔒 Permissions: role and collaborators
- 📄 Document: last edit time
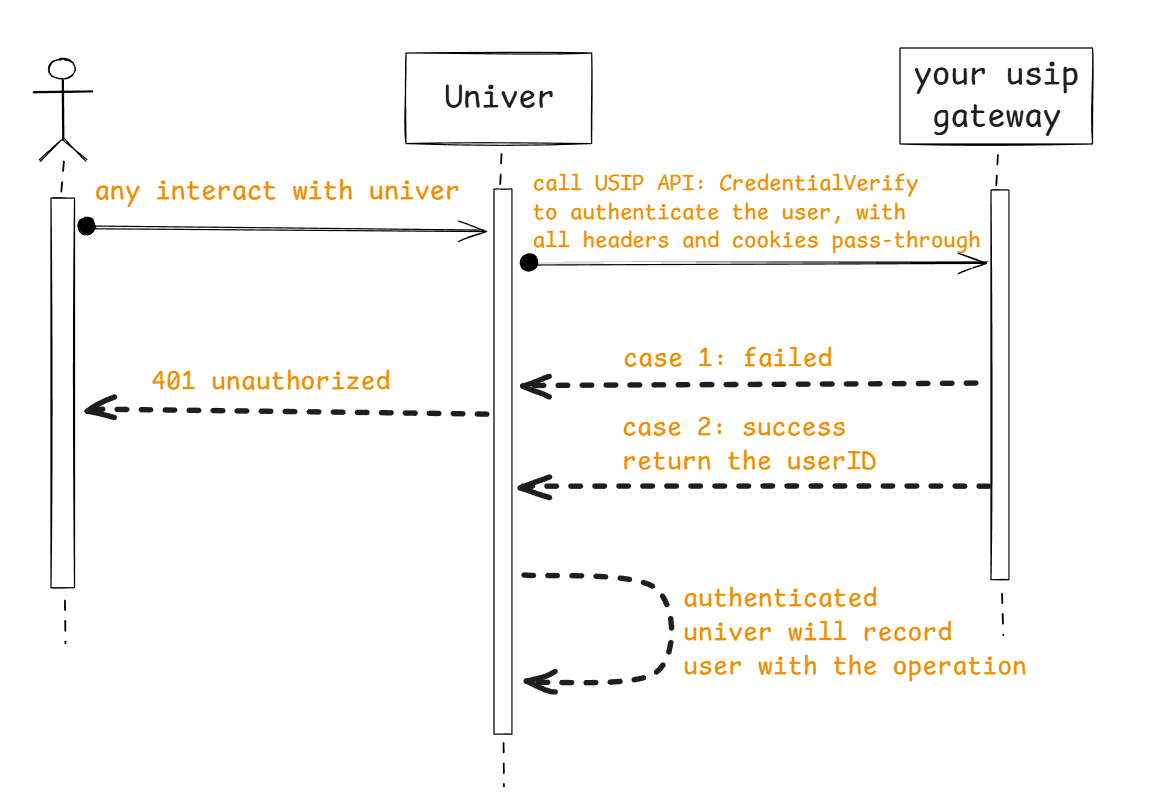
User Authentication
When It’s Called
Every request between client and server triggers authentication.
Flow
API Definition
| Parameter | Type | Example | Description |
|---|---|---|---|
user | Object | - | Returned on successful authentication |
userID | string | ace55655ceabd55 | User ID (recommend open_uid) |
name | string | alice | Display name for collaborators |
avatar | string | https://image.xx/acde55acb45bbead55 | Avatar URL for collaborators |
{ "user": { "userID": "ace55655ceabd55g", "name": "alice", "avatar": "https://image.xx/acde55acb45bbead55" }}Batch User Info
When It’s Called
For showing collaborator avatars/names and comment authors.
Flow
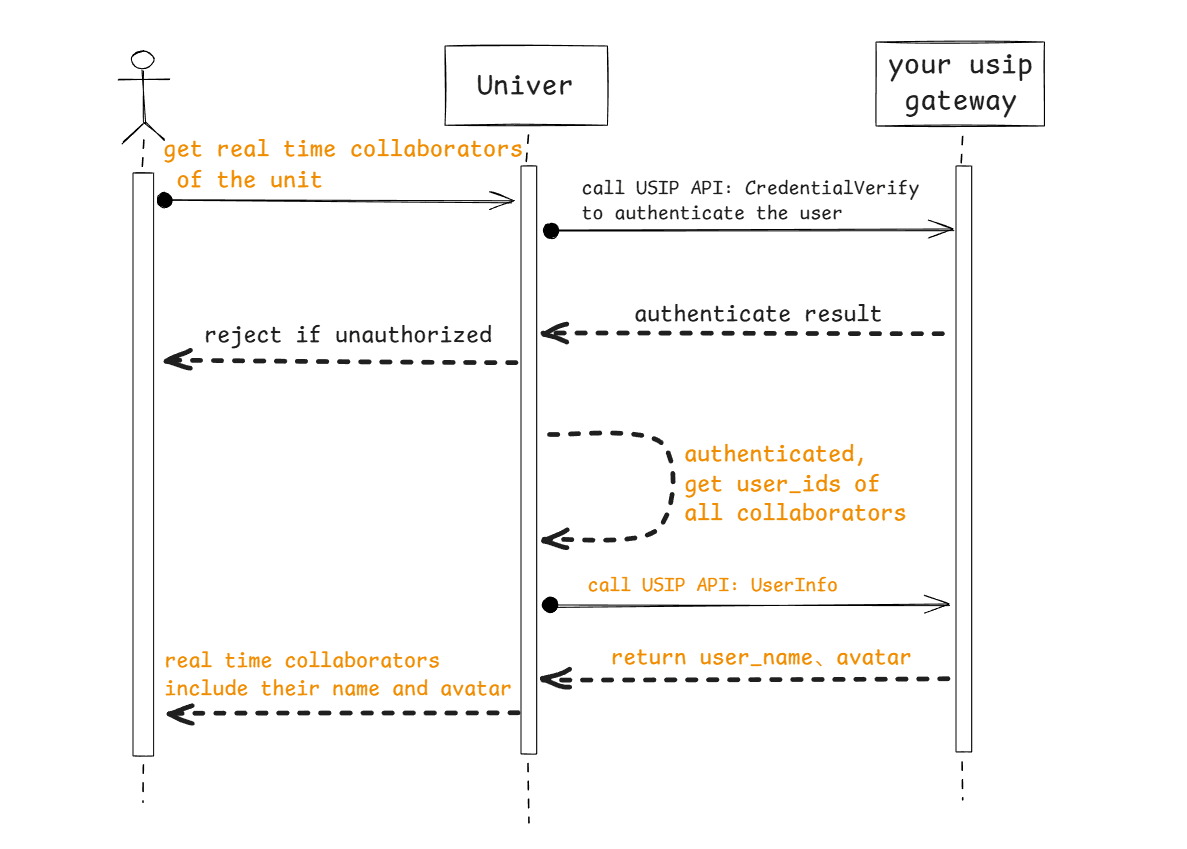
API Definition
| Parameter | Type | Example | Description |
|---|---|---|---|
userIDs | array[string] | ["user_id1", "user_id2"] | User IDs to resolve |
{ "userIDs": [ "user_id1", "user_id2", "user_id3" ]}| Parameter | Type | Example | Description |
|---|---|---|---|
users | array[Object] | - | User objects; same schema as authentication |
{ "users": [ { "userID": "user_id1", "name": "name1", "avatar": "https://xxxx" }, { "userID": "user_id2", "name": "name2", "avatar": "https://xxxx" }, { "userID": "user_id3", "name": "name3", "avatar": "https://xxxx" } ]}User Role
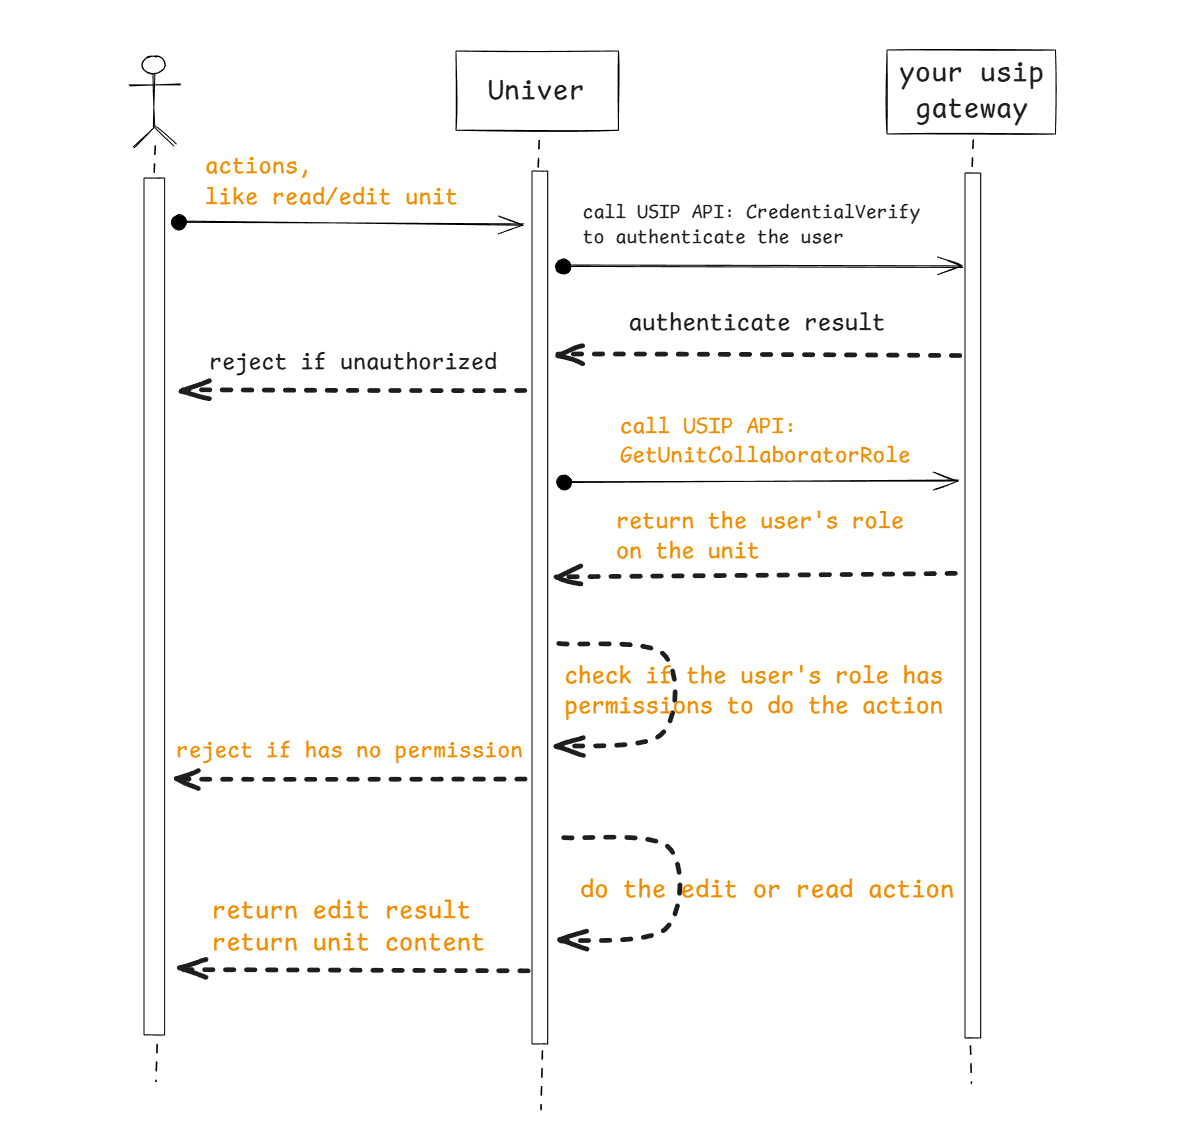
When It’s Called
To determine permissions for reading/editing a document.
Flow
API Definition
| Parameter | Type | Example | Description |
|---|---|---|---|
userID | string | acd5455e44fc5bb55 | User ID |
unitID | string | acff-adebc125e45b | Document ID |
curl -X GET "http://sample.univer.ai/role?unitID=acff-adebc125e45b&userID=acd5455e44fc5bb55"| Parameter | Type | Example | Description |
|---|---|---|---|
userID | string | acd5455e44fc5bb55 | User ID in request |
role | string | editor | Role: owner, editor, reader |
{ "userID": "acd5455e44fc5bb55", "role": "editor"}Document Collaborators
When It’s Called
Required when selecting users for protected ranges or sheets.
Flow
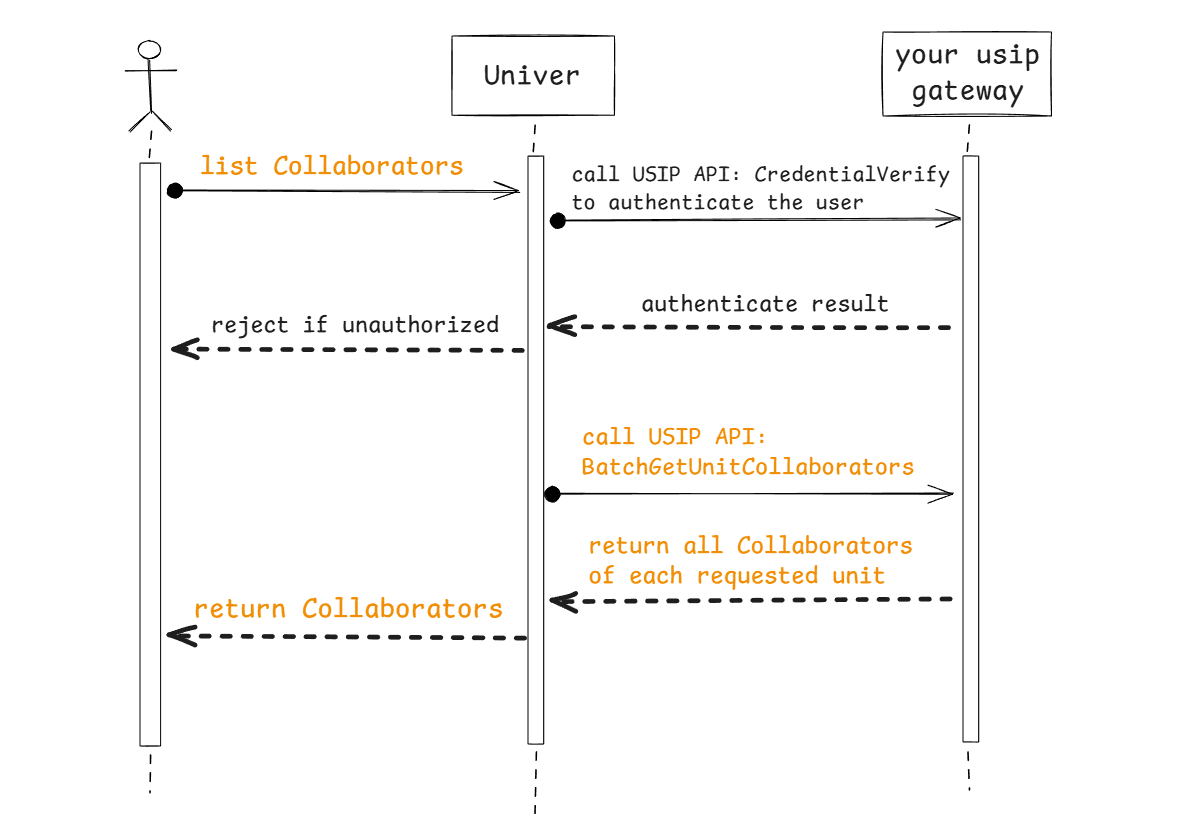
API Definition
| Parameter | Type | Example | Description |
|---|---|---|---|
unitIDs | array[string] | ["unit_id1", "unit_id2"] | Document IDs |
{ "unitIDs": [ "unit_id1", "unit_id2", "unit_id3" ]}| Parameter | Type | Example | Description |
|---|---|---|---|
collaborators | array[Object] | - | Collaborators grouped by document |
unitID | string | unit_id1 | Document ID |
subjects | array[Object] | - | Collaborator list |
role | string | editor | Role: owner, editor, reader |
subject | Object | - | Collaborator info |
type | string | user | Must be "user" |
id | string | acdef12555b12 | User ID |
name | string | alice | User name |
avatar | string | https://image.ai/36554 | Avatar URL |
{ "collaborators": [ { "unitID": "unit_id1", "subjects": [ { "subject": { "id": "1", "name": "alice", "avatar": "https://image.ai/36554", "type": "user" }, "role": "owner" }, { "subject": { "id": "2", "name": "bob", "avatar": "https://image.ai/36559", "type": "user" }, "role": "editor" } ] } ]}Notify Last Edit Time
When It’s Called
For your system to display last edit time.
API Definition
| Parameter | Type | Example | Description |
|---|---|---|---|
unitID | string | acff-adebc125e45b | Document ID |
editTimeUnixMs | int | 1762591632345 | Unix timestamp in milliseconds |
{ "unitID": "unit_id1", "editTimeUnixMs": 1762591632345}| Parameter | Type | Example | Description |
|---|
{}Configure USIP
USIP_ENABLED=true
USIP_URI_CREDENTIAL=https://your-domain/usip/credential
USIP_URI_USERINFO=https://your-domain/usip/userinfo
USIP_URI_ROLE=https://your-domain/usip/role
USIP_URI_COLLABORATORS=https://your-domain/usip/collaborators
USIP_URI_UNITEDITTIME=https://your-domain/usip/unit-edit-time

USIP_APIKEY=

AUTH_PERMISSION_ENABLE_OBJ_INHERIT=false
AUTH_PERMISSION_CUSTOMER_STRATEGIES=universer:
config:
usip:
enabled: true
uri:
userinfo: 'https://your-domain/usip/userinfo'
collaborators: 'https://your-domain/usip/collaborators'
role: 'https://your-domain/usip/role'
credential: 'https://your-domain/usip/credential'
unitEditTime: 'https://your-domain/usip/unit-edit-time'
apikey: ''
auth:
permission:
enableObjInherit: false
customerStrategies: ''Note: When USIP is enabled, all five endpoints must be configured and implemented.
If your USIP service is exposed on the public network, to ensure API request security, we can follow a mechanism similar to AI API requests. You can generate an API key and configure it in the Univer server. When calling the USIP APIs, the request will include the header x-api-key: API_KEY, which you can use to verify the legitimacy of the request.
Permission Model
Univer uses RBAC with fixed roles: owner, editor, reader. You can override minimum role requirements for permission points.
Default permission points:
| Permission | Enum | Description | Minimum Role | Role Enum |
|---|---|---|---|---|
| ManageCollaborator | 2 | Invite/delete collaborators | owner | 2 |
| Copy | 6 | Copy content | reader | 0 |
| 3 | editor | 1 | ||
| Duplicate | 4 | Duplicate document | editor | 1 |
| Share | 7 | Share document | reader | 0 |
| Export | 8 | Export | editor | 1 |
| Comment | 5 | Comment | reader | 0 |
| View | 0 | View | reader | 0 |
| MoveSheet | 25 | Move worksheet | editor | 1 |
| DeleteSheet | 26 | Delete worksheet | editor | 1 |
| HideSheet | 27 | Hide worksheet | editor | 1 |
| CopySheet | 28 | Copy worksheet | editor | 1 |
| RenameSheet | 29 | Rename worksheet | editor | 1 |
| CreateSheet | 30 | Create worksheet | editor | 1 |
| SetCellStyle | 33 | Set cell style | editor | 1 |
| SetCellValue | 34 | Set cell value | editor | 1 |
| InsertHyperlink | 16 | Insert hyperlink | editor | 1 |
| Sort | 17 | Sort | editor | 1 |
| Filter | 18 | Filter | editor | 1 |
| PivotTable | 19 | Pivot table | editor | 1 |
| RecoverHistory | 43 | Recover history | editor | 1 |
| ViewHistory | 44 | View history | reader | 0 |
| SelectProtectedCells | 31 | Select protected cells | editor | 1 |
| SelectUnProtectedCells | 32 | Select unprotected cells | editor | 1 |
| SetRowStyle | 35 | Set row style | editor | 1 |
| SetColumnStyle | 36 | Set column style | editor | 1 |
| InsertRow | 37 | Insert row | editor | 1 |
| InsertColumn | 38 | Insert column | editor | 1 |
| DeleteRow | 39 | Delete row | editor | 1 |
| DeleteColumn | 40 | Delete column | editor | 1 |
| Delete | 42 | Delete document | owner | 2 |
| CreatePermissionObject | 45 | Create protected range/sheet | editor | 1 |
To restrict copy/print to owners:
AUTH_PERMISSION_CUSTOMER_STRATEGIES=[{"action": 3, "role": 2}, {"action": 6, "role": 2}]K8s config:
universer:
  config:
    auth:
      permission:
        customerStrategies: '[ {"action": 3, "role": 2}, {"action": 6, "role": 2} ]'
Object Permission Inheritance
By default, document owners do not automatically own all protected ranges/sheets. To enable inheritance:
AUTH_PERMISSION_ENABLE_OBJ_INHERIT=trueK8s config:
universer:
  config:
    auth:
      permission:
        enableObjInherit: true
Example Implementation
See: https://github.com/dream-num/usip-example
Client Headers
If you need to add custom headers (e.g. Authorization token), use HTTPService interceptors:
import { HTTPService } from '@univerjs/preset-sheets-core'

const injector = univer.__getInjector()
const httpService = injector.get(HTTPService)
httpService.registerHTTPInterceptor({
  priority: 0,
  interceptor: (request, next) => {
    // request.headers.set('Authorization', 'Bearer your-token-here')
    return next(request)
  },
})
import { HTTPService } from '@univerjs/network'
const injector = univer.__getInjector()
const httpService = injector.get(HTTPService)
httpService.registerHTTPInterceptor({
priority: 0,
interceptor: (request, next) => {
// request.headers.set('Authorization', 'Bearer your-token-here')
return next(request)
},
})If you use Edit History, apply the same interceptor to HistoryUniver:
historyLoaderService.historyUniver$.subscribe((historyUniver) => {
  if (!historyUniver) return

  const injector = historyUniver.__getInjector()
  const httpService = injector.get(HTTPService)
  httpService.registerHTTPInterceptor({
    priority: 0,
    interceptor: (request, next) => {
      // request.headers.set('Authorization', 'Bearer your-token-here')
      return next(request)
    },
  })
})
For a full example, see the Univer Pro Sheet starter kit.
How is this guide?